


Since the version 18.0, you have to install AWX on Kubernetes using an AWX Operator for Kubernetes.
In the AWX installation guide on GitHub, they show an example using Minikube.
Here, we will explain you how to run AWX on an Ubuntu server using Microk8s from Canonical .
Microk8s install and setup
As AWX is now delivered as a container, we start the installation with microk8s which will be our container manager on the server.
Install microk8s using snap and setup the user permissions.
sudo snap install microk8s --classic
sudo usermod -a -G microk8s $USER
sudo chown -f -R $USER ~/.kube
microk8s status --wait-ready
Activate the features that we will need later to have a working cluster.
microk8s enable storage host-access dns rbac
microk8s start
microk8s status --wait-ready
Create an alias so you can directly use the kubectl command and not have to use the long microk8s kubectl command.
sudo snap alias microk8s.kubectl kubectl
AWX deployment on Microk8s
After installing microk8s, the goal is to install AWX as a container.
Create the AWX Operator for Kubernetes and follow the deployment logs. Replace awx-operator-f768499d-fhb9bby the name of your operator.
microk8s kubectl apply -f https://raw.githubusercontent.com/ansible/awx-operator/0.9.0/deploy/awx-operator.yaml
kubectl logs -f awx-operator-f768499d-fhb9b
Now we deploy AWX using the operator definition. In this case we will tell the operator to setup the tower_ingress_type as Ingress, with our custom URL in tower_hostname and an already created TLS secret for tower_ingress_tls_secret.
tee awxconfig.yaml<<EOF
---
apiVersion: awx.ansible.com/v1beta1
kind: AWX
metadata:
  annotations:
    kubernetes.io/ingress.class: nginx
  name: awx
  namespace: default
spec:
  tower_create_preload_data: true
  tower_hostname: awx.example.com
  tower_image_pull_policy: IfNotPresent
  tower_ingress_tls_secret: awx-example-com-tls
  tower_ingress_type: Ingress
EOF
kubectl apply -f awxconfig.yaml
Get your default admin password
kubectl get secret awx-admin-password -o jsonpath='{.data.password}' | base64 --decode
MetalLB setup
We will need MetalLB to act as the loadbalancer provided by the public cloud providers. Here is the way to install MetalLB
kubectl apply -f https://raw.githubusercontent.com/metallb/metallb/v0.9.6/manifests/namespace.yaml
kubectl apply -f https://raw.githubusercontent.com/metallb/metallb/v0.9.6/manifests/metallb.yaml
kubectl create secret generic -n metallb-system memberlist --from-literal=secretkey="$(openssl rand -base64 128)"

tee metallbconfig.yaml<<EOF
apiVersion: v1
kind: ConfigMap
metadata:
  namespace: metallb-system
  name: config
data:
  config: |
    address-pools:
    - name: default
      protocol: layer2
      addresses:
      - 192.168.1.100-192.168.1.105
EOF
kubectl apply -f metallbconfig.yaml
Ingress setup
As we have already specify the operator to use the Ingress type to access the service, we now need to setup ingress on Microk8s. First we have try to use the Microk8s add-on ingress to achieve that, but without success.
So we turned to the use of the official Nginx Ingress. Here is the way to install it.
helm repo add nginx-stable https://helm.nginx.com/stable
helm repo update
helm install ingress nginx-stable/nginx-ingress --namespace kube-system
kubectl -n kube-system get service
Edit the ingress awx-ingress created by the operator and add the annotations kubernetes.io/ingress.class: nginx to tell nginx-ingress to address this service.
kubectl edit ingress awx-ingress
annotations:
    kubectl.kubernetes.io/last-applied-configuration:……….
    kubernetes.io/ingress.class: nginx
Check that your ingress has an IP Address and a hostname
kubectl get ingress
NAME            CLASS      HOSTS             ADDRESS        PORTS     AGE
awx-ingress   <none>   awx.example.com  192.168.1.100   80, 443   5m
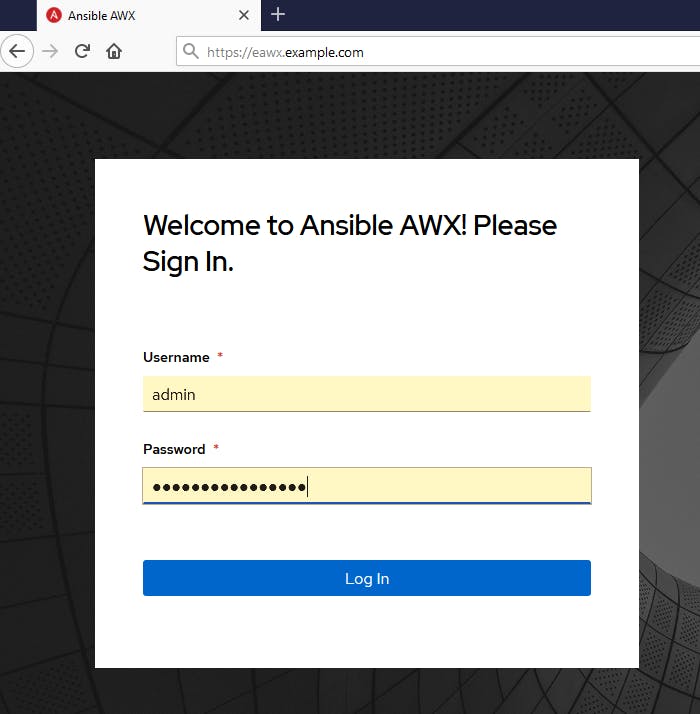
Now you can browse to your URL, and use the default admin password to log into your fresh AWX install!
Feel free to comment this article if you have questions.
References